Sorry for the delay on updates—I had an unexpected hospital stay that set me back a week. I’d started building the night before I was admitted. Anyways, moving on. Earlier this month, parts began arriving in the mail and it felt like Christmas—shout-out to my Nana for making this all possible. Something I probably should have mentioned in my previous post is the itty-bitty notion that you should probably make sure that your parts are compatible before you buy. And by probably, I mean you must absolutely do this or your computer literally will not work. A great resource for that is pcpartpicker.com. Just plug in the pieces you’re thinking of getting (and/or you already have) and it’ll not only tell you if you’ve got any issues, but it’ll also find you the cheapest price on the net. It takes all of ten minutes, and it’ll save you time and needless frustration (not to mention funds) later on.
Putting those pieces together honestly say felt like building Legos. Except these Legos are way more expensive, require you to juggle four or five instruction manuals, and are susceptible to short circuiting if you’ve accidentally generated too much static electricity rubbing your feet on the carpet. But more on that later. There’s no one way to put together a PC, but there are some sequences of events that are generally suggested over other courses of action. So here’s what I did with what I’ve got:
BUT FIRST! Get yourself a magnetic Phillips head screwdriver. PLEASE.
-
Motherboard

First thing you’re gonna do is crack open that case, pop your I/O shield in place, and position your motherboard. For some reason, I was expecting the motherboard to be a lot smaller than it turned out to be, which shows you what I know. This is where I encountered the struggle of working with itty bitty screws without a magnetic screwdriver. Seriously. Get one. I was also kind of paranoid about accidentally shorting the board, so I completed this entire operation wearing latex gloves. Which was a complete nightmare, but I felt very… two by two, hands of blue. Note: the P300 doesn’t come with LED lights. It comes with LED hookups, but not the lights themselves. I spent a good chunk of time wondering if I’d somehow missed them in the box, but it’s the P400 tower that comes with preinstalled LEDs. So I’m going to acquire some lights for a little customisation further down the line. Stay tuned.

-
CPU, RAM, SSD
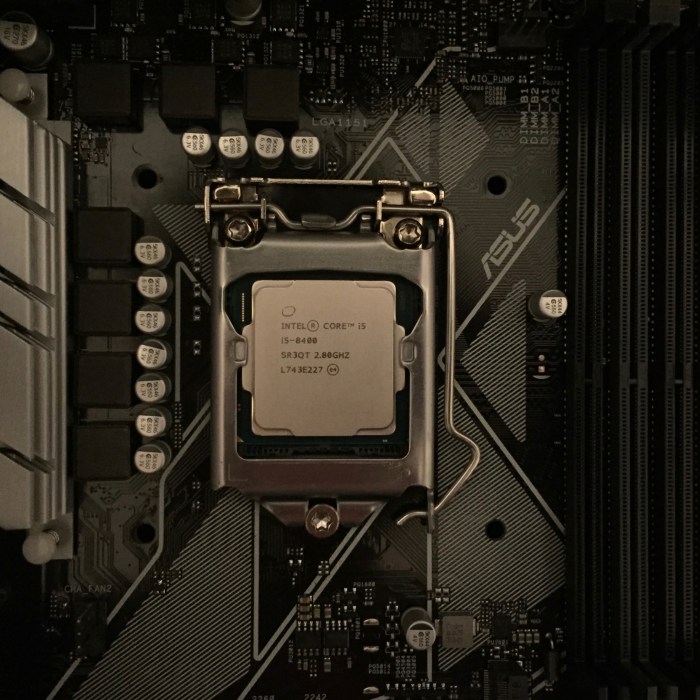
The CPU goes pretty much in the middle of your board; the RAM goes in the spot for RAM (you presumably have an instruction manual. Follow it). Now, I didn’t actually install my SSD at this point, but I wish I had to save myself some awkward maneuvering around my cooling system. The one I went for is an M.2 model, which is slimmer and looks more like an SD card than a hard drive, and is installed directly onto your motherboard.
-
Cooling system
I decided to go for what those in the know call an ‘aftermarket cooler,’ which is basically a cooling system you buy separate from the one that comes with your CPU. This means dismantling the exhaust fan included with the chassis and moving it… elsewhere. I decided to mount it on the front of mine.
-
GPU

Gigabyte Geforce GTX 1050 Ti 4GB
I don’t really have anything special to say about installing the GPU. It was straightforward enough. To be noted: when you plug in your monitors, the GPU is where you’ll do it. The GTX 1050 Ti has one each of DVI, HDMI, and DP ports, so take that into account when getting your wiring sorted. I have one monitor connected to the DVI and the other to the HDMI.
-
PSU

I spent a good couple of hours feeling anxious about the number of wires I didn’t use in plugging in the PSU. There was the 24-pin and the 8-pin… and that was it. I didn’t need to plug in any peripherals or SATAs because my setup hasn’t any. Though I did forget to plug in my power button. But that’s a chassis-to-motherboard connection that has nothing to do with the PSU. I just had a moment when I tried to turn on my computer and couldn’t understand why the lights were working on the motherboard but nothing else seemed to be happening. Remember to plug in the on switch, kids.
-
Monitors
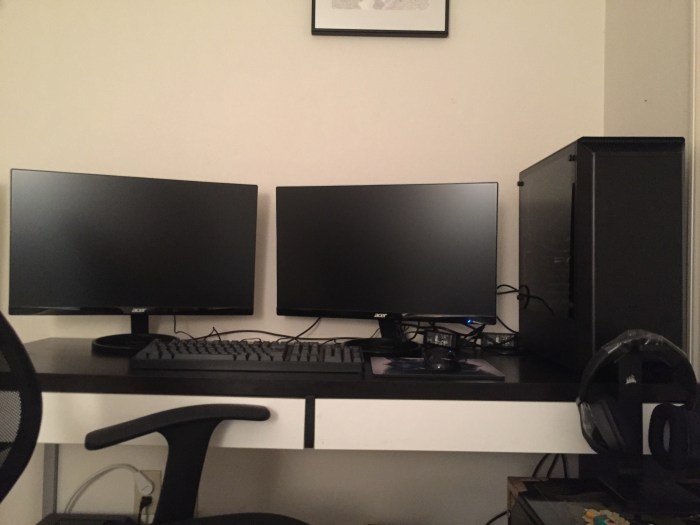
These monitors only came with VGA cables, which I found incredibly frustrating as neither my motherboard nor my GPU supports VGA. The manual lists DVI and HDMI cables as “optional,” though Amazon’s purchasing options don’t provide a selection to include them. So I guess they just opted not to include them for this lucky customer? (what the hell??) Luckily enough, we had some extra cables around the house that I could… borrow for a bit. In setting up two monitors, you’ll want to plug both of them into your GPU and then configure your setup once you have it all up and running in your settings.
Afterthoughts
Good thing I already has a mouse and keyboard or else I’d be screwed. There are certain things people don’t really talk about when discussing their PC builds. Being able to interact with your interface is one thing. Another is accessories: disk drives, wifi cards, operating system. The Asus Prime Z370-P comes with a CD to install handy management apps to control your cooling systems and LED lights if you’ve got them, so you’re gonna need to buy and install an optical drive if you want to take advantage of that. And if you don’t have an ethernet cable/are in a situation where wifi is more practical, you’re gonna need to get a PCI adapter so you can get onto the internet (I got this one, it’ll arrive in a couple days). And last, but certainly not least, your operating system. The basic, personal version of Windows 10 is about $120 and a minor headache to download onto a USB and install.

All said and done, I’ve had fun with this. Also, I’m going to need a name for my rig. My current laptop is Gina and I lovingly refer to my old laptop as Winston. Now taking votes on the nomenclature of the newest addition to the family.
Check back for weekly updates on your friendly neighbourhood noob just trying to teach themselves The Things!
